


е•ҸгҒ„еҗҲгӮҸгҒӣгғ•гӮ©гғјгғ гӮ’иЁӯзҪ®еҮәжқҘгӮӢContact Form 7 гҒ®дҪҝгҒ„ж–№
гӮ«гғҶгӮҙгғӘпјҡWEBеҲ¶дҪң
гӮҝгӮ°пјҡ

вҖ»еҪ“гӮөгӮӨгғҲгҒҜгӮўгғ•гӮЈгғӘгӮЁгӮӨгғҲеәғе‘ҠгӮ’еҲ©з”ЁгҒ—гҒҰгҒ„гҒҫгҒҷгҖӮ
гҒҠе•ҸгҒ„еҗҲгӮҸгҒӣгғ•гӮ©гғјгғ гҒҢз°ЎеҚҳгҒ«дҪңгӮҢгӮӢе®ҡз•Әгғ—гғ©гӮ°гӮӨгғігҖҒContact Form 7 гҒ®дҪҝгҒ„ж–№гӮ’и§ЈиӘ¬гҒ—гҒҫгҒҷгҖӮ
гӮӨгғігғҮгғғгӮҜгӮ№
зӣ®ж¬Ў
1.гғ—гғ©гӮ°гӮӨгғігҒ®гӮӨгғігӮ№гғҲгғјгғ«гҒЁжңүеҠ№еҢ–
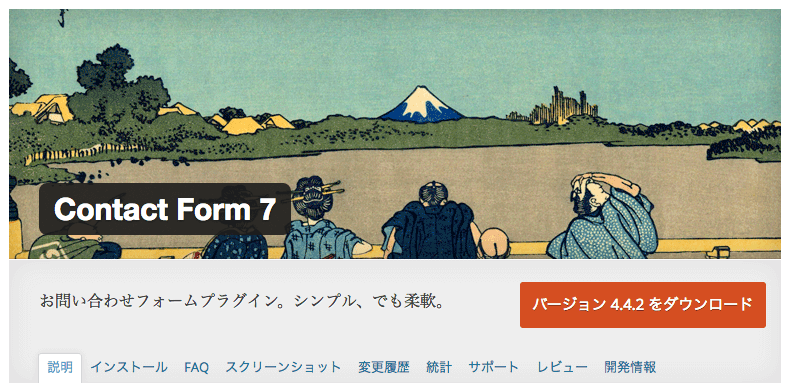
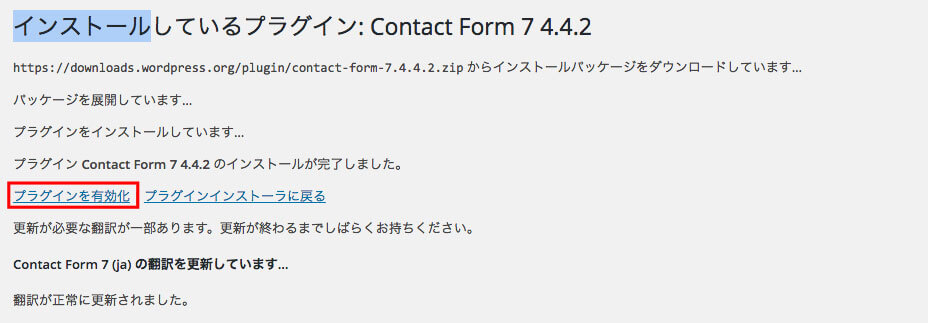
гҒҫгҒҡгҖҒгғ—гғ©гӮ°гӮӨгғігӮ’жӨңзҙўгҒ—гҒҰжңүеҠ№еҢ–гҒ—гҒҫгҒҷгҖӮгғ—гғ©гӮ°гӮӨгғівҶ’ж–°иҰҸиҝҪеҠ гҒ§гғ—гғ©гӮ°гӮӨгғігҒ®жӨңзҙўз”»йқўгӮ’иЎЁзӨәгҒ—гҒҰ[Contact Form 7]гӮ’жӨңзҙўгҒ—гҒҰгӮӨгғігӮ№гғҲгғјгғ«гӮ’гӮҜгғӘгғғгӮҜ
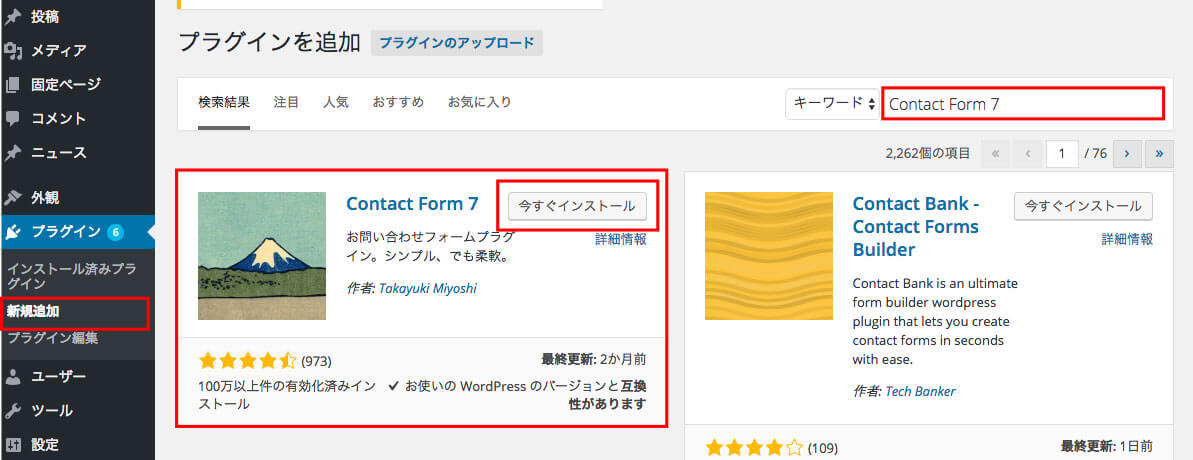
гӮӨгғігӮ№гғҲгғјгғ«гҒҢзөӮгӮҸгҒЈгҒҹгӮүжңүеҠ№еҢ–гӮ’гӮҜгғӘгғғгӮҜ
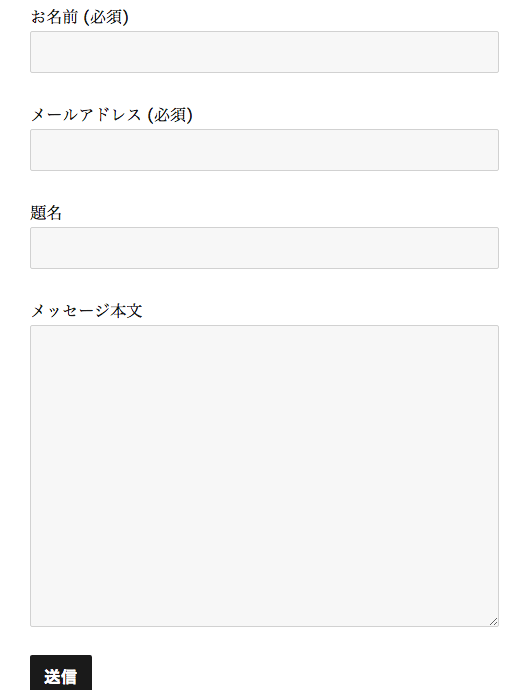
2.гғ•гӮ©гғјгғ гӮ’дҪңжҲҗ
гҒҠе•ҸгҒ„еҗҲгӮҸгҒӣвҶ’ж–°иҰҸдҪңжҲҗгҒ§гғ•гӮ©гғјгғ гҒ®дҪңжҲҗз”»йқўгҒё

иҮӘеҲҶгҒ®е…ҘгӮҢгҒҹгҒ„й …зӣ®гҒ«еҗҚеүҚгӮ’д»ҳгҒ‘гҒҫгҒҷгҖӮгҒқгҒ®еҗҚеүҚгҒ«еҗҲгӮҸгҒӣгҒҹж©ҹиғҪгӮ’гӮҜгғӘгғғгӮҜгҒҷгӮӢгҒЁгӮҰгӮӨгғігғүгҒҢз«ӢгҒЎдёҠгҒҢгӮҠгҒҫгҒҷгҖӮ
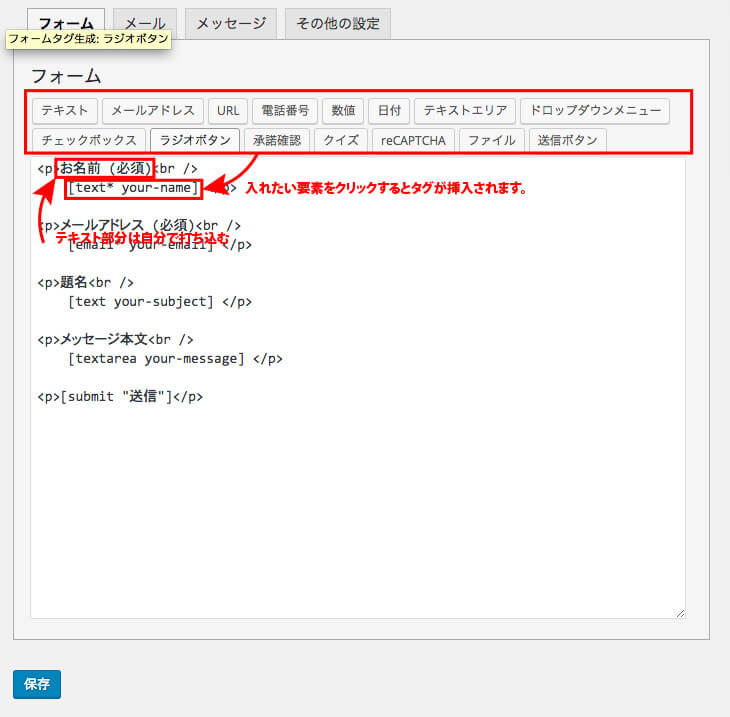
дёӢиЁҳгҒҢжҢҝе…ҘгҒ®гӮҰгӮӨгғігғүгӮҰгҒ§еҝ…й Ҳй …зӣ®гҒ«гғҒгӮ§гғғгӮҜгӮ’е…ҘгӮҢгӮӢгҒЁж–Үеӯ—йҖҡгӮҠеҝ…й Ҳй …зӣ®гҒ«гҒӘгӮҠгғҮгғ•гӮ©гғ«гғҲеҖӨгҖҒгҒ“гҒ®гғҶгӮӯгӮ№гғҲгҒ®й …зӣ®гҒ®гғ—гғ¬гғјгӮ№гғӣгғ«гғҖгғјгҒЁгҒ—гҒҰдҪҝз”ЁгҒҷгӮӢгӮ’е…ҘеҠӣгҒҷгӮӢгҒЁгҖҒгӮҲгҒҸжңүгӮӢгӮ°гғ¬гғјгҒ§еҲқжңҹеҖӨпјҲиЁҳе…ҘиҰӢжң¬пјүгҒҢе…ҘгҒЈгҒҰгҒ„гӮӢзҠ¶ж…ӢгҒ§иЎЁзӨәеҮәжқҘгҒҫгҒҷгҖӮ
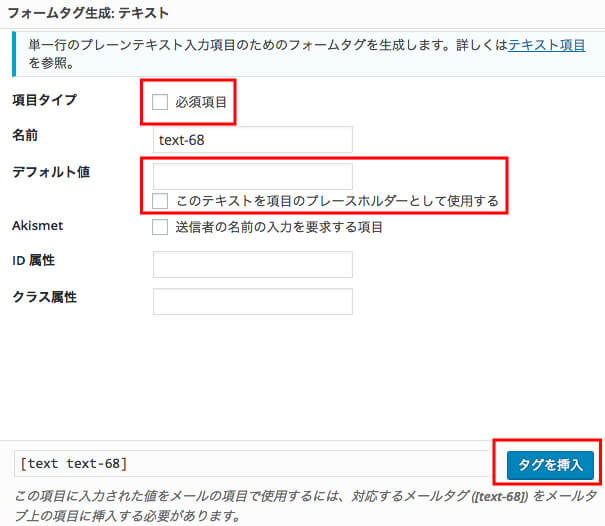
еҝ…й Ҳй …зӣ®гҒ«гҒӨгҒ„гҒҰгҒҜгҖҗ*пјҲгӮўгӮ№гӮҝгғӘгӮ№гӮҜпјүгҖ‘гӮ’ж©ҹиғҪеҗҚгҒ®жЁӘ [text* your-name] гҒ®гӮҲгҒҶгҒ«е…ҘгӮҢгӮӢгҒЁеҝ…й Ҳй …зӣ®гҒ«гҒӘгӮҠгҒҫгҒҷгҖӮ
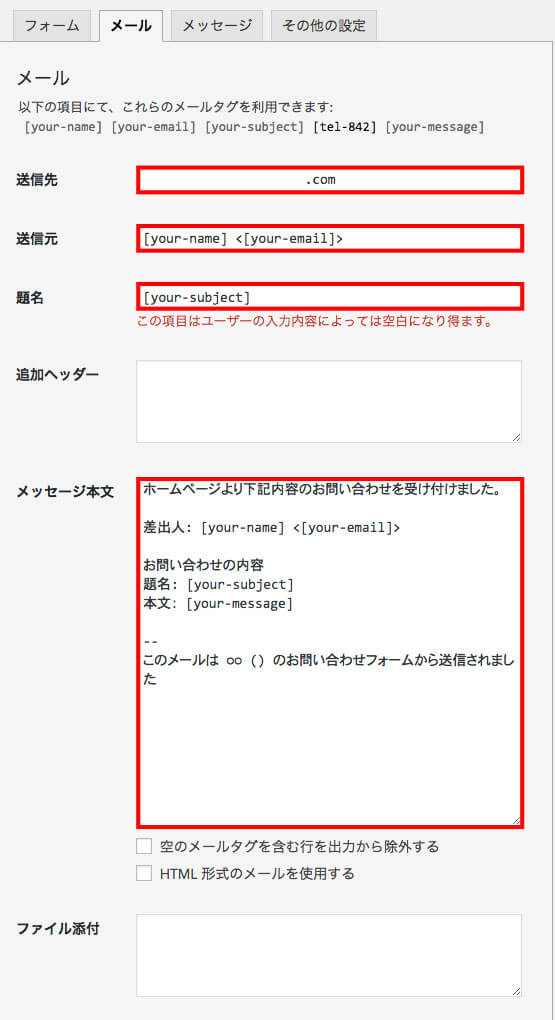
3.гҒҠе•ҸгҒ„еҗҲгӮҸгҒӣйҖҡзҹҘз”ЁгғЎгғјгғ«гҒ®дҪңжҲҗ
гҒҫгҒҡгҒҜиҮӘеҲҶгҒ®жүҖгҒ«еұҠгҒҸгғЎгғјгғ«гҒ®иЁӯе®ҡгӮ’иЎҢгҒ„гҒҫгҒҷгҖӮ[your-в—Ӣв—Ӣв—Ӣ]гҒ§гғҰгғјгӮ¶гғјгҒ®е…ҘеҠӣгҒ—гҒҹй …зӣ®гҒҢеҸ–гӮҠеҮәгҒӣгҒҫгҒҷгҖӮйҖҒдҝЎе…ҲгҒҜиҮӘеҲҶгҒ®гғЎгғјгғ«гӮўгғүгғ¬гӮ№гӮ’е…ҘгӮҢгҒҰгҒҸгҒ гҒ•гҒ„гҖӮ
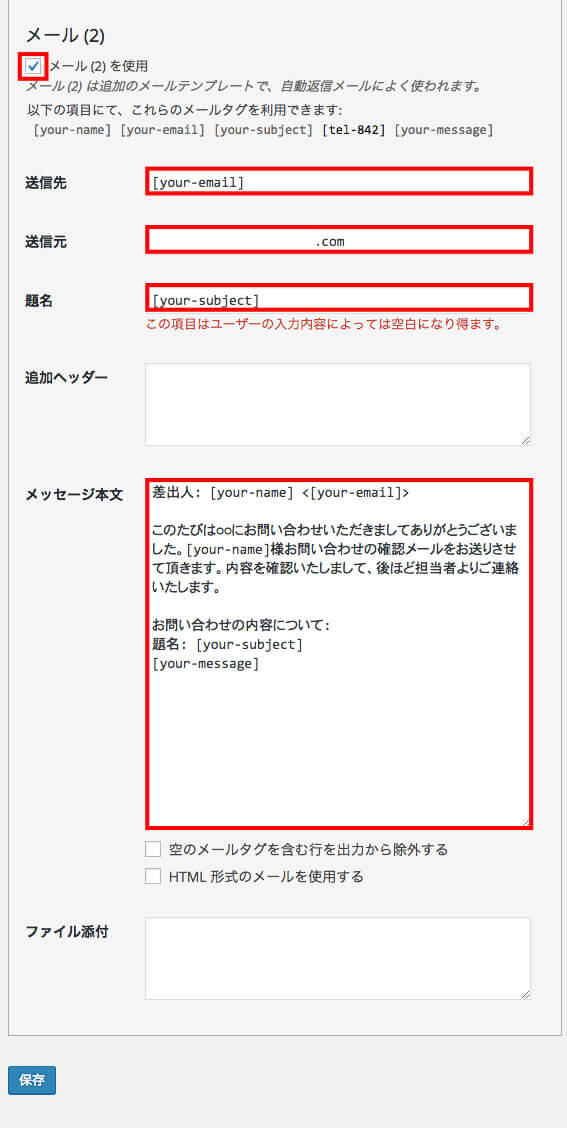
4.гғҰгғјгӮ¶гғјгҒёгҒ®иҮӘеӢ•иҝ”дҝЎгғЎгғјгғ«гҒ®дҪңжҲҗ
гғЎгғјгғ«пј’гӮ’дҪҝз”ЁгӮ’гғҒгӮ§гғғгӮҜе…ҘгӮҢгӮӢгҒЁгғЎгғјгғ«гҒ®йҖҒдҝЎе…ҲгӮ’иҝҪеҠ еҮәжқҘгҒҫгҒҷгҖӮйҖҒдҝЎе…ҲгӮ’[your-email]гҒ«гҒҷгӮӢгҒЁиҮӘеӢ•иҝ”дҝЎгҒ§гғҰгғјгӮ¶гғјгҒ«гғЎгғјгғ«гҒҢеұҠгҒҚгҒҫгҒҷгҖӮйҖҒдҝЎе…ғгҒ«гҒҜиҮӘеҲҶгҒ®гӮўгғүгғ¬гӮ№гҒЁгҒӢгӮ’е…ҘгӮҢгҒҰгҒҸгҒ гҒ•гҒ„гҖӮдёӢиЁҳиЁӯе®ҡгҒ®дҫӢгҒ§гҒҷгҖӮ
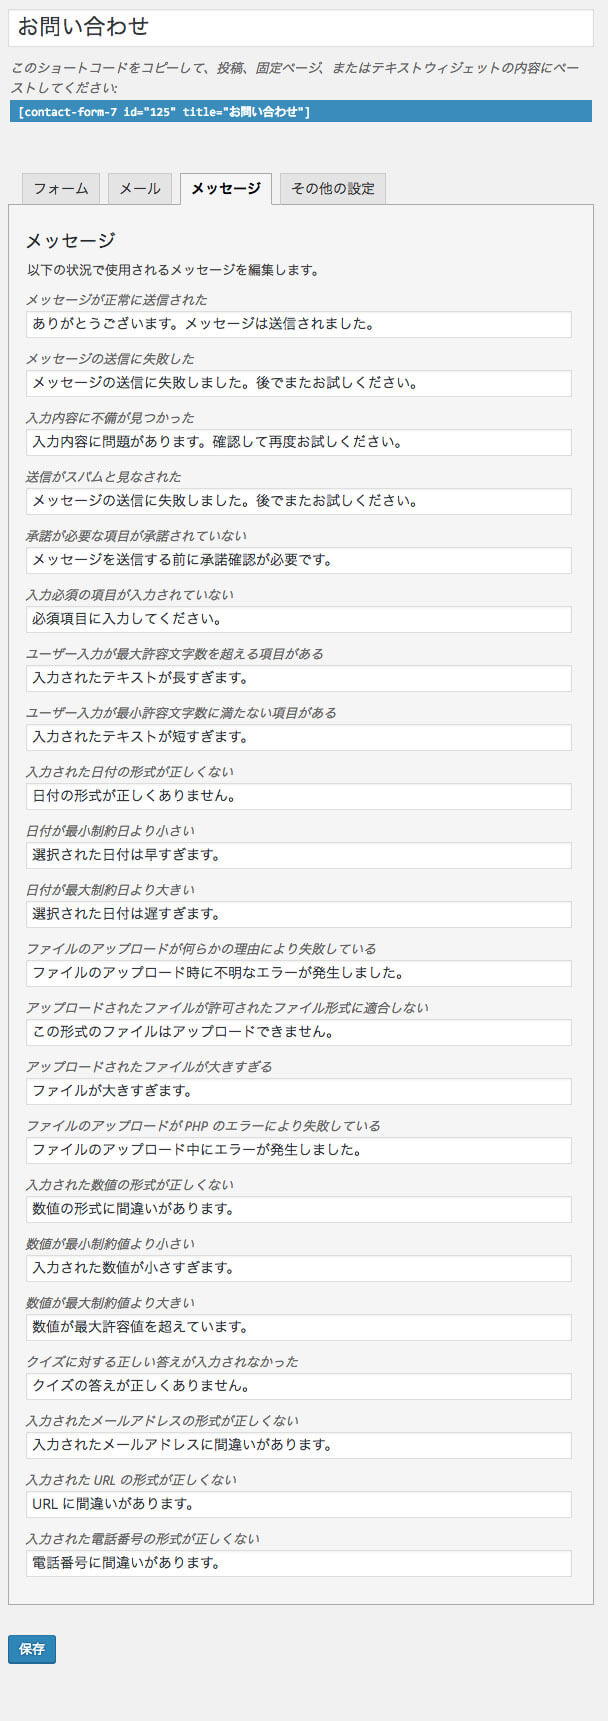
5.гӮЁгғ©гғјпјҲдҫӢеӨ–пјүжҷӮгҒ®гғЎгғғгӮ»гғјгӮёгӮ’еӨүжӣҙгҒҷгӮӢ
е…ҘеҠӣгғҹгӮ№гӮ„гғўгғ¬гҒӘгҒ©гҒҢгҒӮгҒЈгҒҹйҡӣгҒ«гҒ§гӮӢгӮЁгғ©гғјгғЎгғғгӮ»гғјгӮёгӮ’еӨүжӣҙгҒҢеҮәжқҘгҒҫгҒҷгҖӮ
6.иЁӯзҪ®гҖңе®ҢдәҶ
гҒӮгҒЁгҒҜгҒ“гҒ®йғЁеҲҶгҒ®гӮігғ”гғјгҒ—гҒҫгҒҷгҖӮ
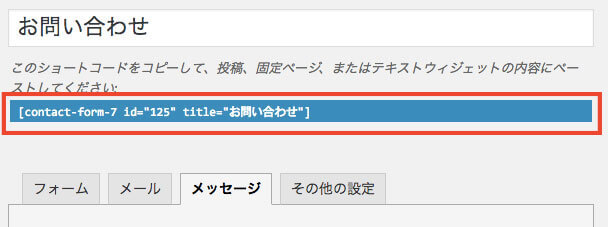
иЁҳдәӢгҒ«гғҡгғјгӮ№гғҲгҒ—гҒҫгҒҷгҖӮ
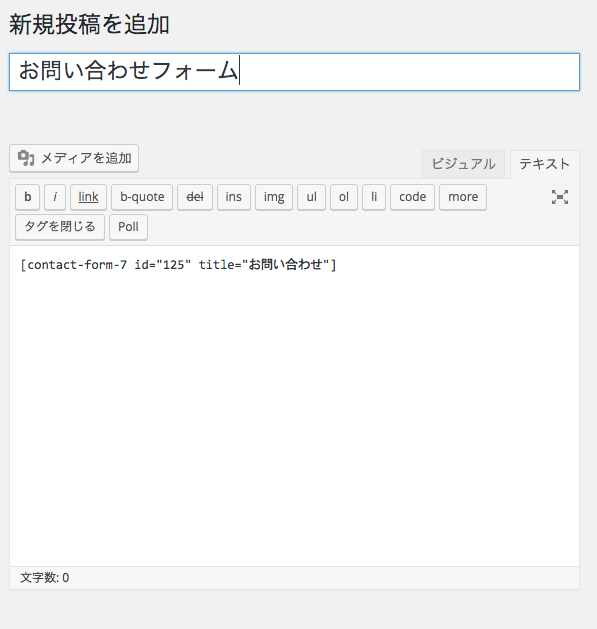
е®ҢжҲҗгҒ§гҒҷгҖӮ
7.гҒҫгҒЁгӮҒ
д»ҘдёҠгҒ§иЁӯзҪ®е®ҢдәҶгҒ§гҒҷгҖӮCSSзӯүгҒ®зҹҘиӯҳгҒҢгҒӮгӮҢгҒ°гғҮгӮ¶гӮӨгғігӮ’еӨүжӣҙгҒҷгӮӢдәӢгӮӮеҸҜиғҪгҒ§гҒҷгҖӮ