
YoutubeгБЃеЛХзФїгВТгГЫгГРгГЉгБІеЖНзФЯгБХгБЫгВЛжЦєж≥Х
гВЂгГЖгВігГ™пЉЪWEBеИґдљЬ
гВњгВ∞пЉЪ
вАїељУгВµгВ§гГИгБѓгВҐгГХгВ£гГ™гВ®гВ§гГИеЇГеСКгВТеИ©зФ®гБЧгБ¶гБДгБЊгБЩгАВ
еЛХзФїгБЃзі†жЭРгВµгВ§гГИгБ™гБ©гБІгВИгБПи¶ЛгБЛгБСгВЛгГЫгГРгГЉгБІеЛХзФїгБМеЖНзФЯгБХгВМгВЛж©ЯиГљгБІгБЩгБМгАБгГ¶гГЉгВґгГЉгБМгВѓгГ™гГГгВѓгБЩгВЛењЕи¶БгБМгБ™гБДгБУгБ®гВВгБВгВКгБ®гБ¶гВВдЊњеИ©гБІгБЩгАВ
еЛХзФїгВѓгГ™гВ®гВ§гВњгГЉгБХгВУгБѓгГЭгГЉгГИгГХгВ©гГ™гВ™гВµгВ§гГИгБ™гБ©гБѓгБ®гБ¶гВВдЊњеИ©гБІгБЧгВЗгБЖгАВ
дїКеЫЮгБѓгАОYoutubeгБЃеЛХзФїгВТгГЫгГРгГЉгБІеЖНзФЯгБХгБЫгВЛжЦєж≥ХгАПгВТзієдїЛгБЧгБЊгБЩгАВ
зЫЃжђ°
гВ≥гГЉгГЙгБЃзієдїЛ
<!DOCTYPE html>
<html lang="ja">
<head>
    <meta charset="UTF-8">
    <style>
        ul {
            list-style: none;
            padding: 0;
        }
        li {
            margin-bottom: 20px;
        }
        iframe{
            border: none
        }
    </style>
</head>
<body>
    <ul>
        <li>
            <iframe
                class="youtube"
                id="player1"
                src="https://www.youtube.com/embed/61JHONRXhjs?enablejsapi=1&mute=1">
            </iframe>
        </li>
        <li>
            <iframe
                class="youtube"
                id="player2"
                src="https://www.youtube.com/embed/FprNSzG8BEY?enablejsapi=1&mute=1">
            </iframe>
        </li>
        <li>
            <iframe
                class="youtube"
                id="player3"
                src="https://www.youtube.com/embed/aBoWInJXSPo?enablejsapi=1&mute=1">
            </iframe>
        </li>
        <li>
            <iframe
                class="youtube"
                id="player4"
                src="https://www.youtube.com/embed/r0s5BlrbRkk?enablejsapi=1&mute=1">
            </iframe>
        </li>
        <li>
            <iframe
                class="youtube"
                id="player5"
                src="https://www.youtube.com/embed/1xfZ2-2tFF8?enablejsapi=1&mute=1">
            </iframe>
        </li>
    </ul>

    <script>
        const tag = document.createElement('script');
        tag.src = "https://www.youtube.com/iframe_api";
        const firstScriptTag = document.getElementsByTagName('script')[0];
        firstScriptTag.parentNode.insertBefore(tag, firstScriptTag);

        const players = {};
        const readyStates = {};

        function onYouTubeIframeAPIReady() {
            const youtubeFrames = document.querySelectorAll(".youtube");

            youtubeFrames.forEach((iframe) => {
                const playerId = iframe.id;

                players[playerId] = new YT.Player(playerId, {
                    events: {
                        onReady: () => {
                            readyStates[playerId] = true;
                            setupHoverEvents(playerId, players[playerId]);
                        }
                    }
                });

                readyStates[playerId] = false;
            });
        }

        function setupHoverEvents(playerId, player) {
            const iframe = document.getElementById(playerId);

            iframe.addEventListener("mouseenter", function () {
                if (readyStates[playerId]) {
                    player.playVideo();
                }
            });

            iframe.addEventListener("mouseleave", function () {
                if (readyStates[playerId]) {
                    player.pauseVideo();
                }
            });
        }
    </script>
</body>
</html>
гВ≥гГЉгГЙгБЃиІ£и™ђ
HTML(iframe)
iframeгБЂгБѓгГЫгГРгГЉжЩВгБЂзЩЇзБЂгБХгБЫгВЛгБЯгВБгБЂгАОyoutubeгАПгБ®гБДгБЖгВѓгГ©гВєеРНгВТжМѓгБ£гБ¶гБКгБНгБЊгБЩгАВ
гБЊгБЯгАБгГЮгВ¶гВєгБЃгВ™гГ≥гВ™гГХгБІгБЃеЖНзФЯгГїеБЬж≠ҐгАБдїЦгБЃеЛХзФїгБМгГЫгГРгГЉгБХгВМгБЯжЩВгБЃеЖНзФЯгГїеБЬж≠ҐгВТеЃЯи°МгБЩгВЛгБЯгВБгБЂгБЭгВМгБЮгВМгБЂIDгВТжМѓгБ£гБ¶гБКгБНгБЊгБЩгАВ
<iframe
  class="youtube"
  id="player1"
  src="https://www.youtube.com/embed/61JHONRXhjs?enablejsapi=1&mute=1">
</iframe>
srcе±ЮжАІгБІгБЩгБМYoutubeAPIгВТеСЉгБ≥еЗЇгБЩгБЯгВБгАБгГСгГ©гГ°гГЉгВњгБЂгАО?enablejsapi=1гАПгВТгАБиЗ™еЛХеЖНзФЯгВТеИґеЊ°гБХгВМгБ™гБДгВИгБЖгБЂгБЩгВЛгБЯгВБгБЂйЯ≥е£∞гВТгГЯгГ•гГЉгГИгБІеЖНзФЯгБХгБЫгВЛгАО?mute=1гАПгБЃгГСгГ©гГ°гГЉгВњгГЉгВТдїШдЄОгБЧгБЊгБЩгАВ
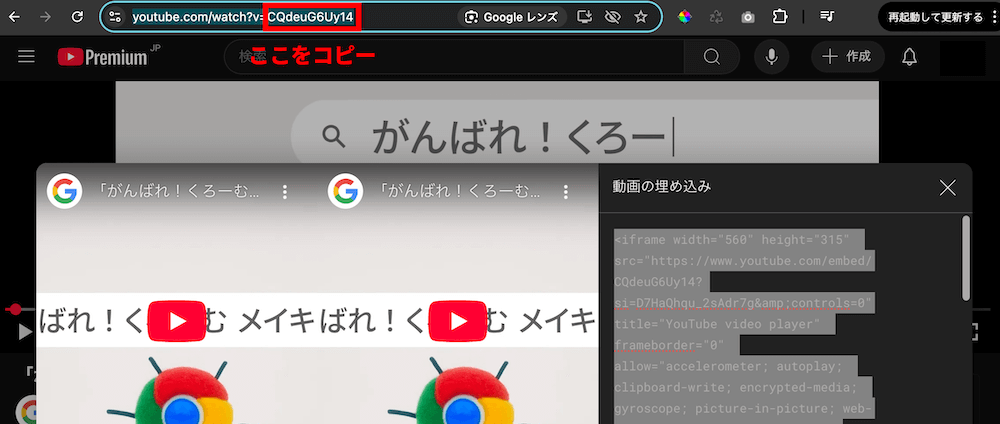
https://www.youtube.com/embed/гБУгБУгБЂеЛХзФїID?enablejsapi=1&mute=1
гБЊгБЯгАБдЄКи®ШгБЂгБВгВЛгАОгБУгБУгБЂеЛХзФїIDгАПгБЃгБ®гБУгВНгБЂYoutubeгБЃеЛХзФїIDгВТжМњеЕ•гБЧгБЊгБЩгАВеЛХзФїIDгБѓеЖНзФЯгГЪгГЉгВЄгБЃURLеЖЕгБЃгГСгГ©гГ°гГЉгВњгГЉгБЃгАОV=гАПгБЃгБ®гБУгВНгВТгВ≥гГФгГЉгБЧгБЊгБЩгАВ
JavaScript
YouTube IFrame APIгВТи™≠гБњиЊЉгВАгВєгВѓгГ™гГЧгГИгВТеЛХзЪДгБЂињљеК†гБЧгБЊгБЩгАВ
const tag = document.createElement('script');
tag.src = "https://www.youtube.com/iframe_api";
const firstScriptTag = document.getElementsByTagName('script')[0];
firstScriptTag.parentNode.insertBefore(tag, firstScriptTag);
гГЧгГђгВ§гГ§гГЉгВТзЃ°зРЖгБЩгВЛгБЯгВБгБЃгВ™гГЦгВЄгВІгВѓгГИгВТи®≠еЃЪгБЧгБЊгБЩгАВ
const players = {};
const readyStates = {};
YouTube IFrame APIгБМжЇЦеВЩгБІгБНгБЯгБ®гБНгБЂеСЉгБ≥еЗЇгБХгВМгВЛйЦҐжХ∞гВТдљЬжИРгБЧгБЊгБЩгАВ
function onYouTubeIframeAPIReady() {
}
iframeгБЂжМѓгБ£гБ¶гБВгВЛгАОyoutubeгАПгБЃи¶Бзі†гВТеПЦеЊЧгБЧгБЊгБЩгАВ
const youtubeFrames = document.querySelectorAll(".youtube");
гГЂгГЉгГЧгБІеЕ®гБ¶гБЃiframeгБЂеѓЊгБЧгБ¶YouTube PlayerгВ™гГЦгВЄгВІгВѓгГИгВТдљЬжИРгАБгГЧгГђгВ§гГ§гГЉгБМжЇЦеВЩеЗЇжЭ•гБЯжЩВгБЃеЗ¶зРЖгБ®гГЫгГРгГЉгВ§гГЩгГ≥гГИгБЃеЃЯи°МгВТгБХгБЫгВЛгБЯгВБгБЃйЦҐжХ∞гБЃи®≠еЃЪгВТи°МгБДгБЊгБЩгАВ
function onYouTubeIframeAPIReady() {
    const youtubeFrames = document.querySelectorAll(".youtube");

    youtubeFrames.forEach((iframe) => {
        const playerId = iframe.id;

        players[playerId] = new YT.Player(playerId, {
            events: {
                onReady: () => {
                    readyStates[playerId] = true;
                    setupHoverEvents(playerId, players[playerId]);
                }
            }
        });

        readyStates[playerId] = false;
    });
}
гГЫгГРгГЉжЩВгБЃеЖНзФЯгБ®еБЬж≠ҐгВТи°МгБЖйЦҐжХ∞гВТдљЬжИРгБЧгБЊгБЩгАВ
function setupHoverEvents(playerId, player) {
}
iframeгБЃIDгБЃеЉХжХ∞гВТгВВгВЙгБ£гБ¶iframeгВТеПЦеЊЧгБЧгБЊгБЩгАВ
const iframe = document.getElementById(playerId);
iframeгБЂгГЫгГРгГЉгБЧгБЯйЪЫгБЂеЖНзФЯгБХгБЫгВЛгБЯгВБгБЃеЗ¶зРЖгВТжЫЄгБНгБЊгБЩгАВ
iframe.addEventListener("mouseenter", function () {
    if (readyStates[playerId]) {
        player.playVideo();
    }
});
гГЫгГРгГЉгВТе§ЦгБЧгБЯйЪЫгБЃеЗ¶зРЖгВТжЫЄгБНгБЊгБЩгАВ
iframe.addEventListener("mouseleave", function () {
    if (readyStates[playerId]) {
        player.pauseVideo();
    }
});
дї•дЄКгБІеЃЯи£ЕеЃМдЇЖгБІгБЩгАВ
еЖНзФЯгБХгВМгБ™гБДе†іеРИгБѓпЉЯ
дЄАеЇ¶гАБгБЭгБЃеЛХзФїгБМйЭЮеЕђйЦЛгБ™гБ©гБЂгБ™гБ£гБ¶гБДгБ™гБДгБЛгВТ祯и™НгБЧгБ¶гБПгБ†гБХгБДгАВ
йЭЮеЕђйЦЛеЛХзФїгБѓиЗ™еЛХеЖНзФЯгБІгБНгБЊгБЫгВУгАВ
гБЊгБ®гВБ
дї•дЄКгАБYoutubeгБЃеЛХзФїгВТгГЫгГРгГЉгБІеЖНзФЯгБХгБЫгВЛжЦєж≥ХгБІгБЧгБЯгАВ